 Skip to content
 Best 3D Printer PEI Sheet & Build Plates Guide 2026
If you’ve ever watched a carefully planned print detach mid-way through a six-hour job, you already understand why your build surface matters just as much as your filament or slicer settings. The 3D printer PEI sheet has become the gold standard for build surfaces over the past few years, and for good reason — but it’s not the only player in the game anymore. From textured PEI build plates to glass 3D printer beds, PEO surfaces, and magnetic systems, there are more options than ever to explore.
This guide walks you through everything you need to know in plain, friendly language so you can make a confident choice for your printer and your workflow.
If you want a stable first layer and easy model removal, check out the Flashforge PEI Sheet and Magnet Tape Assembly.
The PEI surface provides excellent adhesion for PLA, PETG, and other popular materials, while the magnetic base makes removal quick and clean. The part stays securely in place during printing and is easy to remove after cooling—no scrapers or damage.
This is a simple but strategically important upgrade for your printer: fewer rejects, less stress, and more predictable results.
👉 For more details and the latest information, visit:
PEI Sheet and Magnet Tape Assembly for Flashforge Guider 2/2S
Print with confidence from the very first layer.
1. Why a 3D Printer PEI Sheet Matters
Let’s start at the beginning. PEI stands for Polyetherimide, a high-performance thermoplastic resin that happens to have incredible properties for use as a 3D printer build surface. It was originally developed for industrial and aerospace applications thanks to its thermal stability and chemical resistance, but the FDM printing community adopted it quickly and enthusiastically.
So what makes a 3D printer PEI sheet so special? The short answer is that it grips printed filament firmly when hot and releases it when cool. This temperature-dependent adhesion behavior is almost magical in practice. You heat your bed, print your object, wait for the bed to cool down, and the print simply pops off — often without any tools at all.
Before PEI became mainstream, most users relied on blue painter’s tape, hairspray, glue sticks, or specialized coatings like PVA. These solutions worked to varying degrees, but they added friction to the workflow: re-applying after every few prints, uneven adhesion, residue buildup, and inconsistent first layers. PEI solved most of these problems in one go.
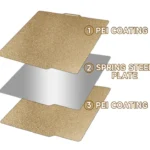
PEI sheets are typically available in two formats. The first is a bare PEI film applied with adhesive to an existing build surface like a glass plate or spring steel sheet. The second — and increasingly popular — is a pre-mounted PEI surface on a spring steel sheet, often designed to attach magnetically to the printer bed. Both approaches deliver the same core benefit: reliable, repeatable 3D printer bed adhesion without consumables.
From a chemistry standpoint, PEI’s surface energy sits in a sweet spot that attracts most thermoplastic filaments during printing while contracting enough on cooling to break the bond. Materials like PLA, PETG, ABS, and ASA all perform well on PEI with minimal or no bed preparation.
2. Textured PEI Build Plate Explained
Once you’ve experienced standard PEI, the textured PEI build plate feels like a natural evolution. Instead of a smooth surface, textured PEI has a matte, grain-like finish — similar in appearance to a fine sandpaper texture — engineered directly into the surface material.
This texture serves several purposes at once. First, it dramatically increases the contact surface area between the first layer of filament and the build plate. More contact means stronger adhesion during the print. Second, it creates a subtle pattern on the bottom of your prints — a clean, matte finish that many users actually prefer over the shiny bottom surface that smooth PEI leaves behind.
Third, and perhaps most practically, textured PEI tends to release prints even more reliably than smooth PEI. The mechanical grip provided by the texture during printing gives way easily once cooled because the peaks and valleys of the texture don’t cling to filament the same way a flat surface does.
Textured PEI is particularly well-suited for materials that tend to bond too aggressively to smooth surfaces. PETG, for example, is notorious for bonding so well to smooth PEI that it can physically tear chunks of the surface off when removed. On a textured PEI build plate, PETG typically releases cleanly and without drama.
Durability is another strong point. High-quality textured PEI surfaces, especially those on hardened spring steel sheets, can last through hundreds or even thousands of prints before showing any significant wear. The texture naturally hides minor surface scratches that would be immediately visible on a polished surface.
For anyone asking whether textured PEI qualifies as the best 3D printer build surface for everyday use, the honest answer for most setups is yes. It handles the widest range of filaments reliably, requires almost no maintenance, and produces consistently good first layers.
If you are tired of models being difficult to remove from the table and having to literally “tear off” the part, it’s time to switch to the Anycubic Spring Steel Magnetic Platform for FDM 3D Printers.
Flexible spring steel + magnetic base = quick removal of models without damage. Simply remove the plate, bend it slightly, and the finished part comes off easily. No spatulas, scratches, or risk of damaging the first layer.
The platform provides excellent adhesion during printing and quick release after cooling. Suitable for most FDM printers and greatly simplifies daily work.
A small upgrade — a huge relief in the process.
👉 More details here:
Spring Steel Magnetic Platform for FDM 3D Printers
Work faster. Remove models more easily. Print with comfort.
3. Smooth vs Textured: Choosing the Right Flexible Build Plate
The flexible build plate concept changed the way people interact with finished prints. Instead of waiting for the bed to cool completely and then prying at a print with a scraper, a flexible plate lets you simply unclip the sheet from the magnetic base, flex it slightly, and watch the print pop free.
Both smooth and textured PEI surfaces are available on flexible spring steel sheets, which means you’re often choosing between finishes rather than fundamentally different systems.
Smooth PEI flexible plates give you a glossy or semi-glossy bottom surface on your prints. This is ideal for display models, figurines, or any print where surface appearance matters. The downside is that PETG can bond too aggressively, and the smooth surface shows wear more quickly.
Textured PEI flexible plates give you that matte, premium finish on print bottoms and handle a wider range of filaments more forgivingly. They’re harder to scratch visibly, easier to clean, and better for functional prints where surface aesthetics are secondary.
| Feature | Smooth PEI | Textured PEI |
|---|---|---|
| Print bottom finish | Glossy / semi-glossy | Matte / grainy |
| PLA adhesion | Excellent | Excellent |
| PETG adhesion | Too strong (risk of damage) | Good (releases cleanly) |
| ABS / ASA | Good with enclosure | Good with enclosure |
| Scratch resistance | Moderate | High |
| Lifespan | 200–500 prints | 500–1500+ prints |
| Best for | Display models, PLA | Functional prints, multi-material |
The flexible build plate format works equally well with both finishes. The key advantage of the spring steel base is that it holds its flat shape magnetically during printing but bends just enough to release prints. You don’t need to flex it dramatically — a gentle bow is usually sufficient.
If you print mostly PLA and want beautiful glossy bottoms, smooth PEI is a great choice. If you print a variety of materials or prioritize longevity, textured PEI wins without much contest.
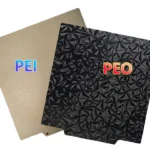
4. PEO Build Plate – Is It Worth It?
PEO, which stands for Polyethylene Oxide, is a newer entrant to the build surface world that has generated genuine excitement in the community. Originally popularized by Bambu Lab on their printer lineup, PEO-coated build plates represent a different approach to the adhesion challenge.
A PEO build plate typically consists of a thin PEO coating applied to a spring steel substrate, usually with a textured surface similar to PEI. The chemistry of PEO is subtly different from PEI, and those differences become very apparent with certain materials.
PEO’s standout capability is its performance with high-temperature and engineering-grade filaments. Materials like PA (nylon), PC (polycarbonate), carbon fiber composites, and glass-fiber-filled filaments adhere exceptionally well to PEO surfaces — often far better than they do on standard PEI. For users who work frequently with these demanding materials, a PEO build plate can be a meaningful upgrade.
The tradeoff is that PEO can be overly aggressive with standard materials like PLA if bed temperature or print settings aren’t dialed in carefully. PLA printed directly on PEO at high bed temperatures can bond so firmly that removal becomes difficult. Most manufacturers recommend using PEO primarily for engineering filaments and sticking with PEI for PLA and PETG.
PEO surfaces also tend to be more sensitive to damage from sharp tools, so extra care is needed when removing prints that don’t release on their own. They’re best treated as a specialized tool rather than a universal daily driver.
As a 3D printer bed upgrade path, PEO makes excellent sense if you’re pushing into engineering materials and find standard PEI inadequate. For general-purpose printing, PEI remains the more versatile choice.
5. Glass 3D Printer Bed – Classic but Reliable
Before PEI took over, the glass 3D printer bed was the aspirational upgrade for most FDM users. Borosilicate glass in particular became popular because of its dimensional stability, thermal resistance, and the flatness it provides — qualities that are harder to guarantee with the factory aluminum beds that ship with many printers.
Glass is genuinely very flat. A quality borosilicate glass bed is manufactured to tight dimensional tolerances, which means your bed mesh leveling compensation has less work to do and your first layers are more consistent across the entire print surface.
The main limitation of bare glass is adhesion. Glass by itself is not a great adhesion surface for most filaments at moderate temperatures. Users typically address this by applying a coating — PEI film, glue stick, hairspray, or specialized solutions — to the glass surface. This gives you the flatness benefit of glass combined with the adhesion properties of your chosen coating.
Garolite (G10) is another glass-fiber-based surface worth mentioning here. It behaves somewhat like glass in terms of stiffness and flatness but has better inherent adhesion for certain filaments like nylon, making it a niche but useful option.
| Aspect | Glass Bed | PEI Sheet |
|---|---|---|
| Flatness | Excellent | Good (spring steel) |
| Native adhesion | Poor (needs coating) | Excellent |
| Print removal | Requires tools or cooling | Easy (flex or cool) |
| Durability | Very high (but breakable) | High |
| Heat-up time | Slower (thermal mass) | Faster |
| Cost | Low to moderate | Low to moderate |
Glass beds also have significant thermal mass, meaning they take longer to heat up and cool down than thin spring steel sheets. This can add minutes to each print cycle, which adds up if you’re running a high-volume setup.
The glass 3D printer bed remains a perfectly valid choice, especially for users who value flatness above all else or who already have a glass bed and want to maximize its performance by applying a PEI film. It’s not obsolete — it’s just no longer the cutting edge.
6. Magnetic Build Plate Systems
The magnetic build plate is really a delivery system rather than a surface material — but it’s worth discussing as a distinct category because it fundamentally changes the user experience of removing prints.
The system works with two components: a magnetic base that attaches permanently to your printer’s heated bed, and a spring steel build sheet coated with PEI (smooth or textured) that attaches to that base magnetically. The magnet holds the sheet firmly during printing, but you can pull it off with a firm tug when the print is done.
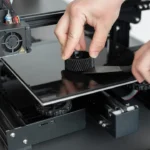
The ability to remove 3D prints easily is the defining advantage of this system. Instead of wrestling with a scraper over your printer, you simply remove the sheet, flex it over your work surface, and the print releases. No tools, no force applied directly to the printer, no risk of gouging your bed surface with a metal scraper.
For multi-printer setups or users who print frequently, having a spare sheet or two is a common strategy. While one sheet cools with a finished print attached, another is already on the printer for the next job. This dramatically increases throughput without any hardware changes to the printer itself.
Magnet strength matters. A poorly matched magnetic base can let the sheet slide or lift slightly at the edges during printing, especially with materials that require high bed temperatures. Quality magnetic systems use high-strength magnets rated for temperatures well above typical printing conditions. Most reputable systems are rated for continuous use up to 120°C, which covers PLA, PETG, ABS, and ASA comfortably.
The magnetic base is typically self-adhesive — it adheres to your printer’s existing aluminum bed with a high-temperature adhesive tape. Installation is straightforward and reversible in most cases.
7. How to Improve First Layer Adhesion
Getting the first layer right is the foundation of every successful print. Even the best 3D printer PEI sheet won’t save you if your settings and preparation are off. Here are the most effective strategies to improve first layer adhesion without reaching for glue sticks or tape.
Bed leveling and Z-offset are the most impactful variables. If your nozzle is too far from the bed, the filament won’t press into the surface enough to create a good bond. If it’s too close, it scrapes or drags across the surface. The goal is a slight squish — the first layer should be visibly pressed into the bed texture, not just sitting on top of it. Most modern printers with automatic bed leveling still benefit from a carefully set Z-offset.
Bed temperature plays a direct role in adhesion chemistry. PEI grips filament better when warm. For PLA, a bed temperature of 55–65°C works well on PEI. PETG benefits from 70–85°C. ABS and ASA typically need 90–110°C. Printing at the low end of a material’s temperature range will reduce adhesion; if you’re having adhesion issues, try raising bed temperature by 5°C before anything else.
First layer speed is often underestimated. Slowing your first layer speed to 20–30mm/s gives the filament more time to make contact with and bond to the surface. Most slicers let you set a first layer speed percentage relative to your normal print speed.
Surface cleanliness matters enormously. Skin oils from your hands are one of the most common causes of adhesion failure on PEI. Isopropyl alcohol (IPA) at 70–99% concentration is the standard cleaning solution. Wipe the surface before each print session. Avoid touching the print area with bare hands after cleaning.
First layer width and line height can be tuned in your slicer. A slightly wider first layer extrusion (110–125% of normal line width) creates more surface contact. A slightly compressed first layer height (around 0.2mm for a 0.4mm nozzle) ensures good squish without going so low that the nozzle blocks filament flow.
For large flat prints or materials prone to warping like ABS, a draft shield or brim adds perimeter lines around your model that increase total contact area with the bed and resist corner lift.
8. Comparing the Best 3D Printer Build Surface Options
By now you have a solid understanding of each surface type. Here’s how they compare side by side across the criteria that matter most for day-to-day printing.
| Criterion | PEI (Smooth) | PEI (Textured) | PEO | Glass |
|---|---|---|---|---|
| PLA adhesion | ★★★★★ | ★★★★★ | ★★★☆☆ | ★★★☆☆ |
| PETG adhesion | ★★☆☆☆ | ★★★★☆ | ★★★☆☆ | ★★★☆☆ |
| ABS / ASA | ★★★★☆ | ★★★★☆ | ★★★★☆ | ★★★★☆ |
| Nylon / PA | ★★★☆☆ | ★★★☆☆ | ★★★★★ | ★★☆☆☆ |
| PC / Engineering | ★★★☆☆ | ★★★☆☆ | ★★★★★ | ★★★☆☆ |
| Print removal ease | ★★★★☆ | ★★★★★ | ★★★☆☆ | ★★★☆☆ |
| Surface longevity | ★★★★☆ | ★★★★★ | ★★★☆☆ | ★★★★★ |
| Maintenance required | Low | Very Low | Low | Moderate |
| Best use case | PLA display prints | General purpose | Engineering materials | Flatness-critical prints |
The takeaway from this comparison is that no single surface wins in every category. Textured PEI comes closest to a universal recommendation, but serious users who work with engineering filaments will benefit from having a PEO sheet on hand as well.
9. When You Need a 3D Printer Bed Upgrade
Not every printer needs an immediate bed upgrade, but there are clear signals that your current setup is holding you back. Recognizing these signs early can save you a lot of wasted filament and frustration.
Inconsistent first layer adhesion is the most obvious symptom. If some prints stick perfectly and others don’t, and you’ve already ruled out slicer settings and temperature variables, your build surface is the likely culprit. Worn PEI, contaminated glass, or a surface that has simply been used beyond its useful life all produce this kind of unpredictable behavior.
Visible wear or damage on the surface — deep scratches, peeled patches on PEI film, chips in a glass bed, or bare metal showing through a coated surface — are clear indicators that replacement is due. Damaged surfaces create uneven adhesion zones that compromise print quality even when the rest of your setup is dialed in.
Prints that warp or lift at corners despite correct temperature settings and enclosure use suggest that your surface isn’t providing adequate adhesion for the materials you’re printing. This is especially common with ABS and ASA on older, worn surfaces.
Difficulty removing prints — whether they’re bonded too strongly or releasing prematurely — can indicate that the surface chemistry has degraded. PEI can become contaminated with oils over time even with regular IPA cleaning, and the adhesion characteristics change gradually.
Switching to new materials is a proactive reason to upgrade. If you’re moving from PLA into PETG, ABS, nylon, or carbon fiber composites, your existing surface may not be optimized for those materials. A 3D printer bed upgrade at this transition point sets you up for success rather than troubleshooting.
Bed leveling issues caused by a warped or damaged surface — rather than the printer’s frame or mechanics — also justify replacing the build surface. A spring steel PEI sheet on a quality magnetic base is significantly flatter and more consistent than many stock aluminum beds.
10. Final Verdict: Which Build Plate Should You Choose?
After walking through all of this, the honest answer is that the right build surface depends on what you print and how you work — but there are clear patterns.
If you are a beginner or casual user printing mostly PLA and some PETG, a textured PEI spring steel sheet on a magnetic base is the single best investment you can make. It requires almost no maintenance, handles the most common filaments beautifully, releases prints easily, and lasts a long time. If your printer didn’t come with one, it’s the first upgrade worth buying.
If you are an enthusiast or intermediate user who prints a range of materials including PETG, ABS, ASA, and occasionally flexible filaments like TPU, the same recommendation applies — textured PEI is your daily driver. Consider keeping a smooth PEI sheet as well for those occasions when you want a polished bottom surface on display models.
If you are an advanced user working with engineering filaments — nylon, polycarbonate, carbon fiber filled materials, or high-temperature composites — then a PEO build plate deserves serious consideration alongside your PEI sheets. PEO gives you the adhesion characteristics that make these difficult materials practical to work with, and it’s worth having one dedicated sheet for those jobs.
If you own an older printer without magnetic bed support and are hesitant to modify it, a glass bed with PEI film applied is a cost-effective upgrade path. You get the flatness of glass and the adhesion of PEI, and the modification is reversible.
The magnetic build plate system is so workflow-friendly that it’s worth adopting regardless of which surface coating you prefer. The ability to swap sheets and remove prints without tools adds up to a meaningfully better printing experience, especially if you run your printer frequently.
Whatever surface you choose, remember that proper maintenance extends its useful life significantly. Clean with IPA before every session, avoid touching the print area with bare hands, use the appropriate bed temperature for each material, and replace surfaces when wear starts affecting print quality rather than waiting until they fail completely.
Your build surface is the foundation every print rests on. Invest in it thoughtfully and it will reward you with fewer failures, better first layers, and a much smoother overall printing workflow.
If you’re exploring powerful and innovative tech beyond 3D printing, the new Lenovo ThinkBook 14 Plus 2026 deserves attention. This laptop blends performance, modern design, and productivity features for demanding users. Read the full in-depth review here: https://bestchinagadget.com/lenovo-thinkbook-14-plus-2026-review/ and discover whether it’s your next smart upgrade.
3D printer PEI sheet3D printer PEI sheet3D printer PEI sheet3D printer PEI sheet3D printer PEI sheet3D printer PEI sheet3D printer PEI sheet3D printer PEI sheet3D printer PEI sheet3D printer PEI sheet
Related
Discover more from bestchina3dprinters.com
Subscribe to get the latest posts sent to your email.
