 Skip to content
 3D Printer Remote Control Software – OctoPrint & AI

Obico AI Monitoring: Smart AI Failure Detection for 3D Printing
Obico AI Monitoring: Smart AI Failure Detection for 3D Printing 1. Introduction to Obico AI Monitoring If you’ve ever walked […]

Beagleprint Camera Review – Remote Monitoring for 3D Printers
Beagleprint Camera Review – Remote Monitoring for 3D Printers Introduction to Beagleprint Camera If you’ve ever started a long 3D […]

AI Camera Monitoring Setup: Smart Surveillance Guide
AI Camera Monitoring Setup: Smart Surveillance Guide Introduction to AI Camera Monitoring Setup If you’ve ever wished your security cameras […]

OctoPrint Setup Guide: Install & Configure for 3D Printing
OctoPrint Setup Guide: Install & Configure for 3D Printing 1. Introduction to OctoPrint Setup Guide If you’ve ever wished you […]
1. Introduction to 3D Printer Remote Control Software
Not too long ago, running a 3D printer meant staying in the same room with it — watching every layer, listening for odd noises, and hoping nothing went wrong the moment you stepped away. That era is firmly behind us. Today, 3D printer remote control software has transformed the way makers, engineers, and small businesses interact with their machines, making wireless print supervision not just a luxury but a genuine productivity tool.
Whether you’re printing a single prototype overnight or managing a small print farm across multiple machines, the ability to monitor and control your printer from anywhere — your phone, tablet, or laptop — changes everything. You can pause a job that’s going wrong, check on print progress from another room (or another country), and receive instant alerts if something fails. That’s the promise of modern WiFi 3D printer management, and it’s one that today’s software ecosystem delivers on remarkably well.
The ecosystem has matured into three clear tiers. At the foundation, you have open-source platforms like OctoPrint that give technically inclined users deep control and near-unlimited customization. On top of that, AI-powered layers like Obico add intelligent failure detection and automation. And for users who want none of the setup complexity, plug-and-play hardware solutions like Beagleprint offer camera-based monitoring out of the box. Together, these tools define the modern remote printing workflow.
In this guide, we’ll walk through each of these layers — how they work, what they’re best suited for, and how to choose the right combination for your specific needs in 2026. Whether you’re a weekend hobbyist or running a professional prototyping operation, there’s a setup here that fits.
2. How a Remote Print Monitoring System Works
Before diving into specific tools, it helps to understand what a remote print monitoring system actually does under the hood — because once you see the logic, choosing between solutions becomes much clearer.
At its core, a remote monitoring setup consists of three components working together:
The host device — typically a small single-board computer like a Raspberry Pi, or a dedicated hardware module — connects directly to your 3D printer via USB. It runs software that reads G-code, sends print commands, and collects real-time telemetry: temperatures, print progress, fan speeds, and more.
The camera or sensor layer adds visual monitoring. A webcam or dedicated camera module streams live video of the print bed, allowing you to literally watch what’s happening. In AI-powered systems, this video feed is analyzed automatically to detect problems like spaghetti-style print failures, detached prints, or clogged nozzles.
The cloud or network layer connects everything to you. Whether through a local network (so you can monitor from within your home or workshop) or a cloud-based dashboard (so you can check from anywhere in the world), this is what enables remote 3D printing workflow management from your phone or browser.
The result is a smart print tracking loop: the printer runs autonomously, the software watches it, and you get notified only when something needs your attention. This is sometimes called “set it and forget it” printing — but with a safety net.
Modern systems go further than just monitoring. They allow you to:
- Start, pause, or cancel prints remotely
- Adjust temperatures or fan speeds on the fly
- Upload new G-code files without physical access
- Review time-lapse videos of completed prints
- Receive push notifications or email alerts for failures or completions
The efficiency gains are real and measurable. Print farms that previously required a technician present at all times can now be managed by a single person monitoring dozens of printers remotely — a shift that directly affects operating costs and throughput.
| Component | Role | Example |
|---|---|---|
| Host Device | Controls printer, sends G-code | Raspberry Pi 4, Orange Pi |
| Camera Module | Visual monitoring & AI analysis | Pi Camera, Beagleprint Cam |
| Software Layer | User interface, alerts, dashboards | OctoPrint, Obico, Beagleprint |
| Network/Cloud | Remote access & data delivery | Local LAN, Obico Cloud, VPN |
3. OctoPrint Remote Access & Raspberry Pi Setup
If you’ve spent any time in the 3D printing community, you’ve heard of OctoPrint. It is, without question, the most widely used open-source 3D printer host software in the world — and for good reason. Developed by Gina Häußge and maintained by an active community, OctoPrint provides a powerful, browser-based interface for controlling virtually any FDM printer.
OctoPrint remote access begins with a Raspberry Pi. The recommended path is OctoPi, a preconfigured Raspberry Pi OS image that bundles OctoPrint with all its dependencies, camera streaming support, and useful default settings. This dramatically simplifies the OctoPrint Raspberry Pi setup compared to installing OctoPrint manually.
Here’s the general flow of getting started:
- Download the OctoPi image from the official OctoPrint website
- Flash it to a microSD card using a tool like Raspberry Pi Imager
- Configure your WiFi credentials in the image before first boot
- Connect the Pi to your 3D printer via USB
- Access the OctoPrint interface from any browser on your local network via
octopi.local
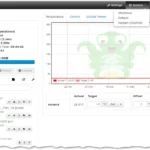
Once running, OctoPrint gives you a full-featured dashboard: you can upload G-code, monitor temperatures in real time with live graphs, control the print head manually, and watch a live webcam stream. The 3D printer webcam setup within OctoPrint is handled through MJPEG-Streamer or uStreamer, both included in OctoPi, and compatible with a wide range of USB webcams and Raspberry Pi Camera modules.
What truly sets OctoPrint apart is its plugin ecosystem. With over 300 community-developed plugins available through the Plugin Manager, you can extend OctoPrint’s capabilities in almost any direction:
- Slicer integrations that let you slice files directly in the browser
- Power control plugins to remotely switch printers on or off via smart plugs
- Notification plugins for Telegram, Discord, Slack, or email alerts
- IFTTT integration to trigger smart home automations based on print events
- Bed leveling assistants, filament change reminders, print statistics, and much more
For remote access beyond your local network — reaching your printer from outside your home — OctoPrint itself doesn’t include built-in tunneling, but this is where companion services (like Obico) or a properly configured VPN come in.
| Feature | OctoPrint Capability |
|---|---|
| Printer Control | Full G-code terminal, axis control, temp management |
| File Management | Upload, select, and manage G-code files remotely |
| Webcam Streaming | Live MJPEG stream via browser |
| Plugin System | 300+ plugins for notifications, power, slicing, etc. |
| API Access | REST API for custom integrations and automation |
| Cost | Free and open source (hardware cost only) |
4. Obico AI Monitoring & Spaghetti Detection
OctoPrint gives you control. Obico (formerly known as The Spaghetti Detective) gives you intelligence. Together, they form one of the most capable 3D printer remote control software combinations available today.
Obico AI monitoring works as a layer on top of OctoPrint — or as a standalone solution for supported printers. Its flagship feature is AI spaghetti detection: a machine learning model that continuously analyzes your webcam feed, frame by frame, looking for the telltale signs of a failed print. When plastic starts extruding in mid-air instead of adhering to the build plate, it creates chaotic “spaghetti” — and Obico’s AI catches it.
When a failure is detected, Obico can:
- Send you a push notification through its mobile app (iOS and Android)
- Automatically pause the print before more filament is wasted
- Alert you via email
- Show you a snapshot of the moment the failure was detected
This kind of automation dramatically reduces filament waste and prevents the kind of multi-hour failures that can ruin a print session — and potentially damage a printer if molten plastic accumulates on the hotend.
3D print failure alerts from Obico are configurable. You can set sensitivity levels (from conservative, which only triggers on obvious failures, to aggressive, which catches subtler anomalies early), and you can choose whether the system should automatically pause or simply notify you and let you decide.
Beyond failure detection, Obico provides a clean remote access tunnel. Once the Obico plugin is installed in OctoPrint and connected to your Obico account, you can access your printer’s full OctoPrint interface from anywhere in the world — without port forwarding, without a VPN, and without any complex network configuration. Obico handles the secure tunnel for you.
Obico is available in two tiers: a free plan with limited AI detection hours per month, and a Pro plan (billed monthly or annually) that includes unlimited AI detection, multiple printer support, and priority features. For users who prefer full data ownership, Obico is also fully open source — you can self-host the entire Obico server on your own hardware.
| Obico Feature | Details |
|---|---|
| AI Failure Detection | Continuous ML analysis of webcam feed |
| Auto Pause | Automatically pauses print on detected failure |
| Remote Tunnel | Secure browser access without port forwarding |
| Mobile App | iOS & Android, push notifications |
| Compatibility | OctoPrint, Klipper/Moonraker, Bambu, Creality |
| Self-Hosting | Fully open source, self-host option available |
| Free Tier | Limited AI hours/month; unlimited on Pro plan |
5. Beagleprint Camera Module for Plug-and-Play Users
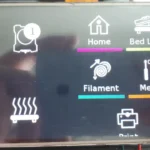
Not everyone wants to configure a Raspberry Pi, manage OctoPrint plugins, or think about network tunneling. For users who want a simpler, more appliance-like experience, the Beagleprint camera module represents a compelling alternative in the 3D printer AI camera space.
Beagleprint is designed around a single idea: remove the setup friction entirely. Rather than assembling a monitoring stack from scratch, Beagleprint ships as a ready-to-use hardware unit with a built-in camera, onboard processing, and a companion app. You mount the device near your printer, connect it to your WiFi network using the mobile app, and you’re monitoring within minutes.
The WiFi 3D printer management approach Beagleprint takes is deliberately accessible. There’s no Linux terminal to navigate, no SD card to flash, no plugin compatibility to worry about. The camera streams your print bed live, and the companion app shows you the feed from anywhere with an internet connection. For many users — especially those new to remote printing or those who simply want something that just works — this is exactly what they need.
Beagleprint also includes AI-based failure detection built into the device itself, analyzing the video feed locally (edge AI processing) rather than relying entirely on cloud servers. This means faster response times and reduced data consumption compared to purely cloud-dependent solutions.
Key practical advantages of Beagleprint’s approach:
- No host computer required — the module connects independently of your printer’s main controller
- Printer-agnostic — works with virtually any FDM printer regardless of firmware or brand
- Mobile-first design — the companion app is optimized for smartphone viewing
- Minimal maintenance — no software updates to manage manually on a Raspberry Pi
The trade-off compared to OctoPrint-based setups is control depth. Beagleprint is a monitoring and alerting tool — it shows you what’s happening and alerts you to problems, but it doesn’t give you the ability to send G-code commands, adjust temperatures mid-print, or interact with your printer’s firmware the way OctoPrint does. For users whose priority is observation and notification rather than hands-on remote control, this is a perfectly reasonable trade-off.
| Aspect | Beagleprint | OctoPrint + Obico |
|---|---|---|
| Setup Complexity | Very Low (plug and play) | Medium–High (technical setup) |
| Printer Control | Monitor only | Full remote control |
| AI Detection | Yes (edge processing) | Yes (cloud + local) |
| Printer Compatibility | Any FDM printer | Wide, USB-dependent |
| Target User | Hobbyists, beginners | Power users, farms |
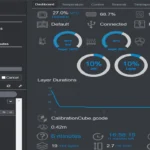
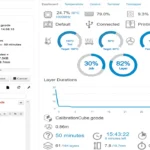
6. 3D Printer Cloud Dashboard & Mobile Control
As operations scale beyond a single printer, the interface you use to manage them needs to scale too. This is where the 3D printer cloud dashboard becomes essential — and where solutions like Obico’s multi-printer view and Klipper-based fleet management tools shine.
A cloud dashboard aggregates status information from all your printers into a single screen. At a glance, you can see which machines are printing, what percentage complete each job is, which printers are idle, and whether any have triggered failure alerts. This kind of unified overview is what makes print farm monitoring tools practical at scale.
Obico’s dashboard, for instance, allows users on the Pro plan to manage multiple printers from a single account. Each printer gets its own card showing live camera feed thumbnail, print progress, temperature readings, and current status. Clicking into any printer gives you full control — just as if you were accessing that printer’s OctoPrint interface directly.
For Klipper-based printers, Mainsail and Fluidd offer browser-based dashboards with similar functionality. Moonraker — the API layer that Klipper exposes — allows third-party applications and dashboards to connect to multiple Klipper instances, enabling custom fleet management setups for technically advanced users.
Mobile control is increasingly a first-class feature across the ecosystem. Obico’s mobile app provides a purpose-built experience for iOS and Android: live camera feeds, temperature controls, print pause/resume, and push notifications are all accessible in a well-designed mobile interface. OctoPrint itself has community-built mobile companion apps, though Obico’s native app is generally considered superior for on-the-go management.
Key features to look for in a cloud dashboard for print farms:
| Feature | Why It Matters |
|---|---|
| Multi-printer overview | See all machine statuses at a glance |
| Per-printer live feed | Drill into any machine's visual state |
| Centralized alerts | All failure notifications in one place |
| Print history & statistics | Track utilization, failure rates, uptime |
| G-code file management | Upload and queue jobs across machines |
| Mobile responsiveness | Manage from phone without compromise |
7. Security & Stability in Wireless Print Supervision
Wireless print supervision introduces real security considerations that are worth taking seriously — especially if you’re exposing your printer to the internet. A 3D printer that’s accessible remotely is, in effect, a networked device with physical capabilities. Getting security right protects both your hardware and your network.
Here are the primary approaches and their security profiles:
Local Network Only (No Internet Exposure) The safest configuration. OctoPrint runs on your local network, accessible only via octopi.local or a local IP address. No internet exposure means no external attack surface. The trade-off: you can only monitor when connected to the same WiFi network. This is ideal for home setups where you’re rarely far from the printer.
VPN-Based Remote Access A step up in complexity but a major step up in security. By running a VPN server on your home network (WireGuard is the most recommended modern option due to its performance and simplicity), you can securely connect to your home network from anywhere and access OctoPrint as if you were local. Your printer is never exposed directly to the internet. This is the preferred approach for privacy-conscious power users.
Obico Secure Tunnel Obico’s built-in tunneling uses encrypted WebSocket connections to securely relay traffic between your OctoPrint instance and the Obico cloud, then to your browser or mobile app. Your printer is never directly internet-facing — Obico acts as a relay. This is more secure than naive port forwarding and much simpler than self-managing a VPN. Obico uses HTTPS/TLS for all communications.
Port Forwarding (Not Recommended) Directly exposing OctoPrint to the internet via router port forwarding is strongly discouraged by the OctoPrint project itself. OctoPrint is not designed to be a hardened internet-facing service, and doing so without additional protections creates meaningful security risks.
For the 3D printer webcam setup specifically, camera streams should only be accessible over encrypted connections. Both MJPEG-Streamer (used by OctoPi) and the Obico tunnel support HTTPS streaming, ensuring your video feed isn’t transmitted in the clear.
Stability tips for wireless setups:
- Use a 2.4 GHz WiFi band for the Raspberry Pi if range is a concern (5 GHz is faster but shorter range)
- Consider a wired Ethernet connection for the Raspberry Pi if your printer is near a router
- Use a quality, official Raspberry Pi power supply to avoid undervoltage issues that cause instability
- Enable OctoPrint’s built-in watchdog to automatically restart the server if it becomes unresponsive
8. Final Verdict: Choosing the Right Setup in 2026
So which 3D printer remote control software stack is right for you? The honest answer depends entirely on your use case, technical comfort level, and how much control versus convenience you need. Let’s break it down clearly.
For Hobby Use
If you have one or two printers, enjoy tinkering, and want the most capable remote control experience, the classic combo of OctoPrint + Obico is hard to beat. OctoPrint gives you deep printer control, and Obico adds AI failure detection and secure remote access without any network configuration headaches. The upfront setup takes a few hours, but you end up with a system that’s endlessly customizable and free to run (hardware costs aside).
If you’d rather skip the technical setup entirely, Beagleprint is a genuinely good solution for monitoring and basic alerting. Mount it, connect it to WiFi, and you’re done. You won’t have G-code-level control, but you’ll know instantly if something goes wrong.
For Professional Prototyping
In a professional context — where printer downtime costs real money and print quality matters — the OctoPrint + Obico combination at its Pro tier is the recommended path. The AI failure detection pays for itself quickly in saved filament and avoided reprints. For Bambu Lab printers (which have their own closed ecosystem), Obico has developed compatibility layers that allow partial integration.
Consider adding a dedicated print statistics and reporting plugin to OctoPrint so you can track utilization, failure rates, and material consumption over time. That data becomes valuable when justifying equipment investments or optimizing workflows.
For Print Farms
At print farm scale, the 3D printer cloud dashboard becomes non-negotiable. Obico’s Pro multi-printer dashboard is the most turnkey option. For farms using Klipper-based printers (increasingly common due to Klipper’s speed and configurability advantages), a Moonraker-based setup with a custom dashboard or Mainsail provides strong per-printer visibility.
Some print farm operators opt for fully self-hosted Obico installations, running the Obico server on a local NAS or mini PC. This eliminates cloud subscription costs at scale and keeps all data on-premises — important for operations handling proprietary designs or sensitive client work.
| Use Case | Recommended Stack | Key Benefit |
|---|---|---|
| Hobby (tech-savvy) | OctoPrint + Obico Free | Full control + AI monitoring, low cost |
| Hobby (plug & play) | Beagleprint | Zero setup, instant monitoring |
| Professional Prototyping | OctoPrint + Obico Pro | Reliable failure detection, full control |
| Print Farm (cloud) | Obico Pro Multi-printer Dashboard | Unified oversight, scalable |
| Print Farm (on-prem) | Self-hosted Obico + OctoPrint | Data sovereignty, no subscription cost |
The Big Picture
The 3D printing world has reached an inflection point where remote management isn’t an afterthought — it’s a core part of how printers are designed and used. Whether you’re running a single Ender 3 in a spare bedroom or a warehouse of Voron printers producing parts around the clock, the tools to monitor, control, and automate that operation have never been more capable or accessible.
OctoPrint remains the beating heart of the open ecosystem, Obico adds the AI intelligence that turns monitoring into genuinely useful automation, and Beagleprint lowers the barrier for users who just want something that works without the technical overhead. In 2026, there’s a solution for every level of commitment — and every level of printer ambition.
Start with what fits your life today. The beauty of this ecosystem is that it grows with you.
Looking to build or upgrade your own tech website or online store? Professional web development, SEO optimization, and modern digital solutions can help your project grow faster and reach a wider audience. Explore expert services for website creation, design, and optimization here:
https://andreevwebstudio.com/
Create a powerful online presence and turn your ideas into a scalable digital platform. 🚀
3D printer remote control software3D printer remote control software3D printer remote control software3D printer remote control software3D printer remote control software3D printer remote control software3D printer remote control software3D printer remote control software3D printer remote control software3D printer remote control software3D printer remote control software3D printer remote control software3D printer remote control software3D printer remote control software3D printer remote control software3D printer remote control software3D printer remote control software3D printer remote control software3D printer remote control software3D printer remote control software
