 Skip to content
 Creality
Shenzhen, China
3D Printers & Accessories
The world's most popular 3D printer brand. Ender series legends, K1 high-speed models, and reliable budget options for every maker with massive community support.
Creality Print Software
If you have recently stepped into the world of 3D printing, or if you are a seasoned maker looking for a dedicated slicing tool, you have probably heard the name Creality Print. This software has become one of the go-to options for anyone using a Creality 3D printer — and for good reason.
Creality Print is the official slicing and print management software developed by Creality, one of the most recognized brands in the consumer 3D printing industry. Designed to work seamlessly with Creality’s lineup of printers, the software gives users a full pipeline — from importing a 3D model all the way through to sending the final print job directly to the machine.
But what makes Creality Print software stand out in a market that already includes well-known tools? The answer lies in how well it is tailored to Creality hardware, its clean interface designed for beginners, and the depth of options available for advanced users who want fine-grained control.
Whether you are printing your first benchy or dialing in tolerances for a functional mechanical part, Creality Print aims to be the one tool that handles it all. This review walks you through everything: what it is, how to get it, how to configure it, and whether it deserves a place on your desktop.
2. What Is the Creality Print Slicer
At its core, Creality Print is a slicer — and understanding what a slicer does is the first step to understanding why it matters so much in 3D printing.
A slicer is a software application that takes a 3D model file (typically in STL, OBJ, or 3MF format) and converts it into a set of machine instructions called G-code. G-code tells your printer exactly what to do: where to move the print head, how fast to travel, how much filament to extrude, when to heat the bed, and thousands of other micro-decisions that collectively determine whether your print comes out beautifully or ends up as a tangled mess.
The Creality Print slicer is built on a solid slicing engine with a user interface developed specifically for the Creality ecosystem. When you open a model in Creality Print, the software analyzes the geometry and, based on your settings, generates layer-by-layer toolpaths. These paths define the shells of your object, the infill pattern inside, any support structures needed for overhangs, and the first layer adhesion strategy.
What sets the Creality Print slicer apart is its tight integration with Creality printers. When you select your printer model, the slicer automatically loads calibrated machine profiles, nozzle configurations, and build volume constraints. This removes a lot of guesswork, especially for newer users who may not know the specific capabilities of their machine.
The slicer also supports multi-material printing workflows and includes a visual 3D preview that lets you inspect each layer before committing to a print — a feature that can save hours of failed prints.
3. How to Download Creality Slicer
Getting the software is straightforward. The official source for the Creality slicer download is Creality’s official website at creality.com, under the Software or Support section. Always use the official source to ensure you are downloading the latest verified version without any third-party modifications.
Here is a general overview of the download and installation process:
| Step | Action | Notes |
|---|---|---|
| 1 | Visit creality.com | Navigate to the official Creality website |
| 2 | Go to Support → Software | Find the Creality Print section |
| 3 | Select your OS | Windows, macOS, or Linux versions available |
| 4 | Download the installer | File size is typically 200–400 MB |
| 5 | Run the installer | Follow standard installation wizard prompts |
| 6 | Launch Creality Print | Select your printer model on first launch |
Creality Print is available for Windows 10/11 (64-bit), macOS, and Linux. The Windows version tends to have the most frequent updates and the broadest community support. Make sure your computer meets the basic hardware requirements — a modern multi-core processor, at least 4 GB of RAM, and a dedicated or integrated GPU capable of handling 3D viewport rendering will give you a smooth experience.
It is always worth checking the release notes on the download page to see what has changed between versions, particularly if you are upgrading from an older installation.
4. Creality Print Setup for Beginners
Once installed, the Creality Print setup process is designed to be beginner-friendly. On first launch, the software walks you through a short configuration wizard that is genuinely helpful.
Step 1 — Select Your Printer The first and most important step is selecting your printer model from the built-in library. Creality Print includes profiles for virtually all current Creality models. Selecting the correct printer ensures the build volume, default temperatures, and motion settings are all appropriate for your machine.
Step 2 — Configure Your Extruder Next, you will confirm or set your nozzle diameter. Most Creality printers ship with a standard 0.4 mm brass nozzle. If you have upgraded to a 0.6 mm or 0.8 mm nozzle, this is where you update that information.
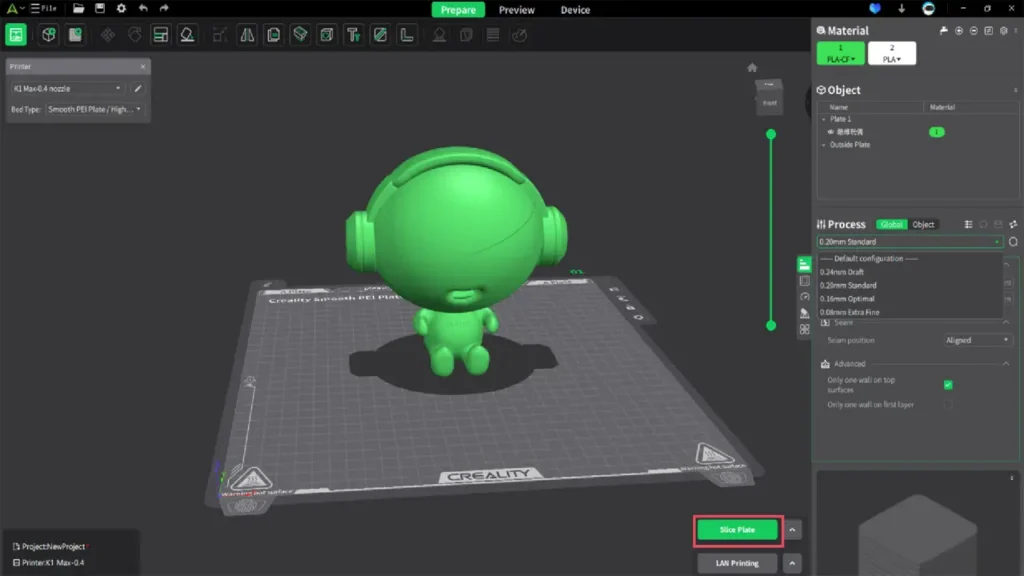
Step 3 — Import a Model With the printer configured, you can import your first 3D model by dragging and dropping an STL, OBJ, or 3MF file onto the build plate. The model will appear in the 3D viewport where you can move, scale, and rotate it.
Step 4 — Choose a Material Profile Select the filament type you are using — PLA, PETG, ABS, TPU, etc. Creality Print includes preset material profiles that automatically adjust temperatures, fan speeds, and retraction settings for each material type.
Step 5 — Slice the Model Hit the Slice button. Within seconds (or up to a minute for complex models), the software will generate G-code and display a layer preview. You can scrub through the layers visually to check for any obvious issues.
Step 6 — Export or Send Finally, export the G-code to an SD card or USB drive, or if your printer supports it, send the job directly over Wi-Fi using Creality Print’s cloud or LAN printing features.
This workflow is clean, logical, and does not overwhelm beginners with too many options upfront — while keeping advanced settings accessible for those who need them.
5. Creality Print Settings Explained
Understanding Creality Print settings is where most of the real learning curve lives — and where the biggest improvements to your print quality come from. Let’s break down the most important settings categories.
| Setting | What It Controls | Typical Range |
|---|---|---|
| Layer Height | Vertical resolution of each printed layer | 0.1 mm – 0.3 mm |
| Print Speed | How fast the print head moves while extruding | 40 – 150 mm/s |
| Infill Density | How solid the interior of the part is | 10% – 80% |
| Nozzle Temperature | Hotend temp for melting filament | 190°C – 260°C |
| Bed Temperature | Heated bed temperature for adhesion | 0°C – 110°C |
| Supports | Auto-generated support structures for overhangs | On / Off / Custom |
| Retraction | Pulls filament back to reduce stringing | 1 mm – 6 mm |
| Fan Speed | Part cooling fan intensity | 0% – 100% |
| Wall Count | Number of perimeter shells | 2 – 5 walls |
Layer Height is arguably the single most impactful setting. A lower layer height (like 0.1 mm) produces smoother, more detailed prints but takes significantly longer. A higher layer height (0.3 mm) speeds things up at the cost of visible layer lines.
Print Speed needs to be balanced with material behavior. Pushing too fast, especially with flexible or high-viscosity materials like PETG or ABS, leads to under-extrusion and layer adhesion failures. Creality Print’s default speeds are generally conservative and reliable.
Supports are critical for any model with overhangs beyond roughly 45 degrees. Creality Print offers normal supports, tree supports, and custom support placement — giving you control over where material is wasted versus where it is essential.
Temperature settings should match the filament manufacturer’s recommendations. For standard PLA, a nozzle temperature of 200–215°C and a bed temperature of 50–60°C is a typical starting point.
6. Using Creality Print Profiles
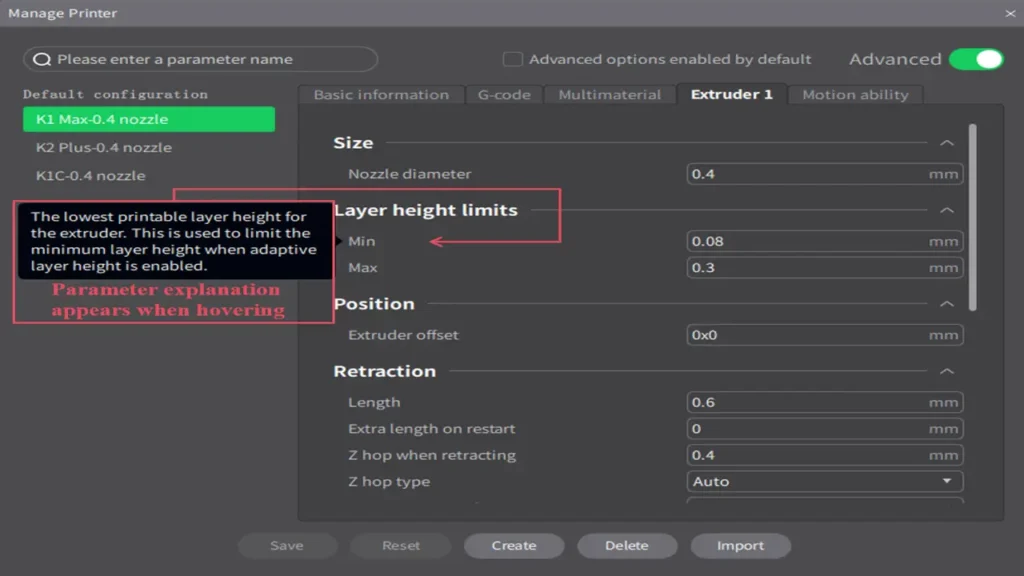
One of the most time-saving features in Creality Print is its printer and material profile system. A Creality Print profile is essentially a saved collection of settings optimized for a specific printer and filament combination.
When you add a printer to Creality Print, the software loads a default machine profile that contains the build volume, maximum speeds, and hardware-specific motion parameters. These are maintained by Creality and reflect the tested capabilities of that specific machine.
Beyond machine profiles, material profiles define the thermal and flow properties of your filament. Creality Print ships with built-in profiles for common materials including:
- PLA — the most beginner-friendly material, low warp, easy to print
- PETG — stronger and more heat-resistant than PLA, slightly trickier to tune
- ABS — high heat resistance, requires an enclosure for best results
- TPU — flexible, requires slow speeds and tuned retraction
- ASA — UV-resistant outdoor material, similar to ABS in behavior
You can also create custom profiles and save them for future use. This is particularly useful if you have found a set of settings that works perfectly for your machine and filament brand — you can save it as a named profile and return to it instantly without re-entering values.
Profiles can be exported and shared with other Creality Print users, which has created a growing community of user-contributed profiles for niche materials and specialty setups.
7. Creality Slicer for Ender 3
The Ender 3 is arguably the most popular consumer 3D printer ever made, and it is no surprise that Creality Print has deep support for the entire Ender series. If you are running a Creality slicer for Ender 3 workflow, you will find the experience exceptionally smooth.
Creality Print includes dedicated profiles for:
- Ender 3
- Ender 3 Pro
- Ender 3 V2
- Ender 3 V2 Neo
- Ender 3 S1
- Ender 3 S1 Pro
- Ender 3 S1 Plus
- Ender 3 Max Neo
- Ender 3 V3 SE
- Ender 3 V3 KE
Each of these profiles accounts for the specific build volume, firmware behavior, and motion system of that printer variant. For example, the Ender 3 S1 and S1 Pro use a direct drive extruder, which significantly changes retraction behavior compared to the Bowden-style setup on the original Ender 3. Creality Print handles this difference automatically when the correct printer is selected.
The Ender 3 V3 SE and KE models, being newer printers with automatic bed leveling (via the CR Touch or strain gauge sensors), also benefit from Creality Print’s built-in bed leveling compensation support. When combined with the printer’s own leveling routine, this produces first layers that adhere consistently across the entire build plate.
For Ender 3 users specifically, Creality Print is one of the easiest slicers to start with because the defaults are already dialed in. You genuinely can go from zero to your first print in under 30 minutes.
8. Creality Print Configuration Tips
For users who want to go beyond the basics, Creality Print configuration offers a wide range of advanced controls that can significantly improve print quality, reduce material waste, and speed up overall workflow.
Adaptive Layer Height This feature automatically varies the layer height throughout the print based on model geometry. Flat areas use thicker layers for speed, while curved or detailed areas use thinner layers for better resolution. It is an excellent middle ground between speed and quality.
Seam Positioning The seam is the point where each layer starts and ends, and it often leaves a small visible mark. Creality Print lets you position the seam in specific locations — back of the model, a random position to scatter the marks, or aligned to a custom angle. For aesthetic parts, controlling seam placement is worth the extra minute of configuration.
Ironing Ironing passes the hot nozzle over the top surface of the print after laying down material, essentially smoothing it out. This gives top surfaces a noticeably cleaner, glossier finish — particularly effective for display models and parts where top surface quality matters.
Support Interfaces Adding interface layers between your model and support material makes supports easier to remove and reduces scarring on the supported surface. Creality Print allows you to configure interface layer thickness, pattern, and density independently from the main support settings.
Z-Hop / Lift When enabled, the nozzle lifts slightly when traveling across open areas of the print. This reduces the risk of the nozzle knocking over tall, thin features — a common cause of print failures on taller objects.
Print Sequence When printing multiple objects at once, you can choose between printing all objects simultaneously (layer by layer across all objects) or printing each object completely before moving to the next. The second method, called “one at a time,” reduces stringing between objects but requires careful placement to avoid the printhead colliding with completed objects.
| Advanced Feature | Best Used For |
|---|---|
| Adaptive Layer Height | Curved models where speed and detail both matter |
| Seam Positioning | Aesthetic or display models where visible seams matter |
| Ironing | Parts needing smooth, flat top surfaces |
| Support Interfaces | Any model with supported overhangs and clean removal needed |
| Z-Hop | Tall, fragile prints prone to being knocked over |
| One at a Time Printing | Batch printing multiple small objects with minimal stringing |
9. Creality Print Tutorial for Better Prints
Learning to use any slicer well is a gradual process, but following a structured approach accelerates results significantly. Here is a short Creality Print tutorial section with actionable advice for getting better prints faster.
Start with a Known-Good Model Before dialing in your settings, print a well-known calibration model like a simple 20mm cube or a temperature tower. These models help you identify issues with temperature, speed, or calibration before you invest time in printing something important.
Use the Layer Preview Every Time Before every print, scroll through the layer preview in Creality Print. Look for areas where supports look too thin, where infill seems discontinuous, or where the first layer appears too close or too far from the build plate. Catching these issues in software costs you nothing. Catching them mid-print costs you time and filament.
Calibrate Your Flow Rate Even with good profiles, filament diameter can vary slightly between brands or even spools. Printing a single-wall calibration cube and measuring the wall thickness with calipers lets you fine-tune your flow rate multiplier in Creality Print to match your actual filament.
Work in Profiles Resist the temptation to tweak settings randomly. Instead, save a baseline profile and create new profiles for each major change you test. This way you always have a working fallback and a record of what you changed.
Temperature Towers for New Filaments Every time you try a new filament brand or type, print a temperature tower. A temperature tower is a model that prints at different temperatures on each section, letting you visually compare bridging, stringing, and surface quality at a glance. Creality Print can be configured with custom G-code scripts that automatically change temperature at specific Z heights.
Monitor First Layer Adhesion The first layer is the foundation of every print. If it does not adhere well, the print will fail. Watch the first layer of every new print and do not walk away until you are satisfied that it is laying down flat, with good width and no gaps. In Creality Print, you can adjust Live Adjust Z (on supported printers) in real time, or simply re-slice with a tweaked first layer height offset.
Do Not Neglect Cooling Part cooling fans have a major impact on overhang quality, bridging, and stringing. For PLA, running the cooling fan at 100% after the first few layers generally produces the best results. For ABS and ASA, however, rapid cooling causes warping — so reduce fan speed significantly or disable it entirely.
Keep the Software Updated Creality releases regular updates to Creality Print that include bug fixes, new printer profiles, and performance improvements. Check the official website periodically for new versions and review the changelog to understand what has changed.

10. Final Verdict on Creality Slicer Software
After walking through every major aspect of Creality Print, it is time for a clear-eyed summary of what this Creality slicer software does well and where it fits in the broader landscape of slicing tools.
What Creality Print Does Well
The most compelling strength of Creality Print is its out-of-the-box compatibility with Creality hardware. Because the software is developed by the same company that builds the printers, the default profiles are accurate, tested, and reliable. You spend less time hunting for settings and more time printing.
The interface is genuinely approachable for beginners. The setup wizard, the clear layout of basic versus advanced settings, and the visual 3D preview make the learning curve gentler than some competing slicers that expose every option simultaneously.
Cloud and LAN printing support is a practical, modern feature that many users will appreciate. Being able to monitor and send jobs to a printer without physically handling an SD card streamlines the workflow, especially for users who have their printer set up in a different room or workshop.
Where It Has Room to Grow
As with any software, there are areas where Creality Print is still catching up to more established slicers. The plugin and scripting ecosystem is less mature than some alternatives. Community-contributed resources, while growing, are not as extensive as those available for older, more widely adopted tools.
For users printing on non-Creality hardware, Creality Print is not the obvious first choice — its strengths are most pronounced within the Creality ecosystem.
Who Should Use Creality Print
| User Type | Recommendation |
|---|---|
| Beginner with a Creality printer | Strongly recommended — start here |
| Intermediate user with Ender series | Excellent choice with full profile support |
| Advanced user wanting deep customization | Good option; advanced settings are accessible |
| User with non-Creality hardware | Consider other slicers with broader printer support |
| Professional or multi-printer environment | Usable, but evaluate workflow needs carefully |
Bottom Line
Creality Print is a well-made, actively developed slicing tool that earns its place as the primary slicer for the Creality ecosystem. It does not try to be everything to everyone — instead, it focuses on doing one thing very well: helping Creality printer owners get great results with minimal friction.
If you own a Creality printer and have not yet tried Creality Print, download it from the official Creality website, spend an hour with the setup process, and print a test model. The experience is likely to impress you with just how ready-to-use it is right out of the box.
For the Ender 3 owner printing their first part, the Ender 3 S1 user pushing speed limits on a direct drive setup, or the Creality K1 owner exploring high-speed printing — Creality Print is the software built for your machine, by the people who built the machine. That alignment of hardware and software is a real advantage, and it shows in the print results.
Creality
Shenzhen, China 3D Printers & Accessories
The world's most popular 3D printer brand. Ender series legends, K1 high-speed models, and reliable budget options for every maker with massive community support.
Discover more from bestchina3dprinters.com
Subscribe to get the latest posts sent to your email.

Pingback: Creality Print Review 2026: Features, Pros, Cons and Verdict | StackSheriff